AI Features Overview
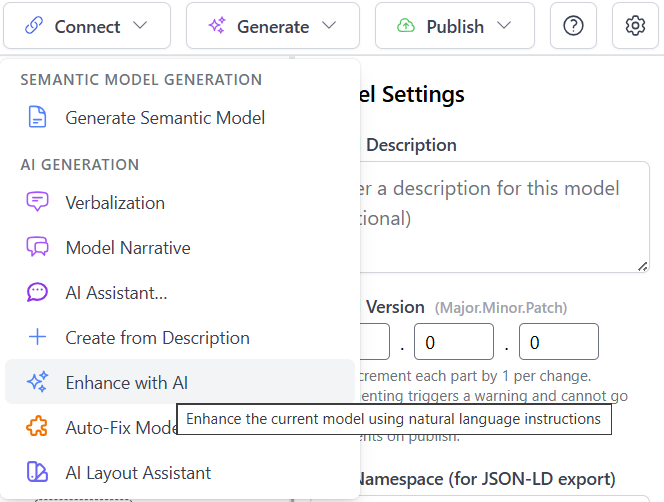
The ORM Modeler provides several AI-powered features accessible through the Generate menu. These features leverage large language models to assist with model creation and refinement.
The primary AI features include:
- Create Model from Description: Generate a complete ORM model from a natural language description of your domain.
- Enhance Model with AI: Improve an existing model using natural language instructions to add, modify, or refine model elements.
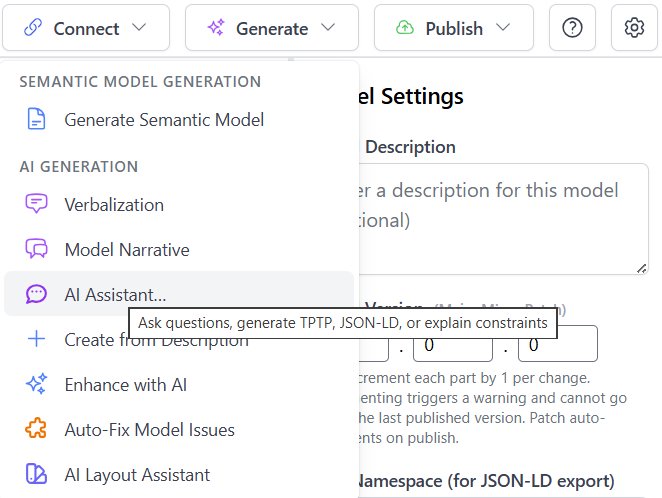
- AI Assistant: Ask questions, create JSON-LD exports, or get explanations of constraints and model elements.
- AI Layout Assistant: Automatically arrange model elements on the canvas for optimal visual clarity.
Create Model from Description
The Create Model from Description feature allows you to generate a complete ORM model by providing a natural language narrative of your domain. This feature is ideal for quickly prototyping models or getting started with a new domain.
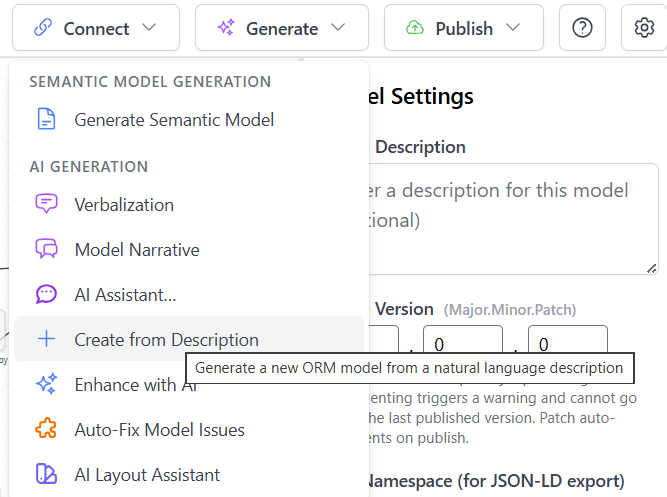
To use this feature, select "Create from Description" from the Generate menu. A dialog will appear where you can enter your domain description.
How It Works
The feature provides two important configuration options:
- Interpretation Mode: Choose between Alethic (facts about the world) or Deontic (rules and obligations). Alethic mode treats constraints as statements of what must be true, while Deontic mode treats them as rules that should be followed.
- World Assumption: Select between CWA (Closed World Assumption - what's not known is false) or OWA (Open World Assumption - unknown is possible). CWA assumes anything not explicitly stated is false, while OWA allows for unknown or uncertain information.
Example: Library System
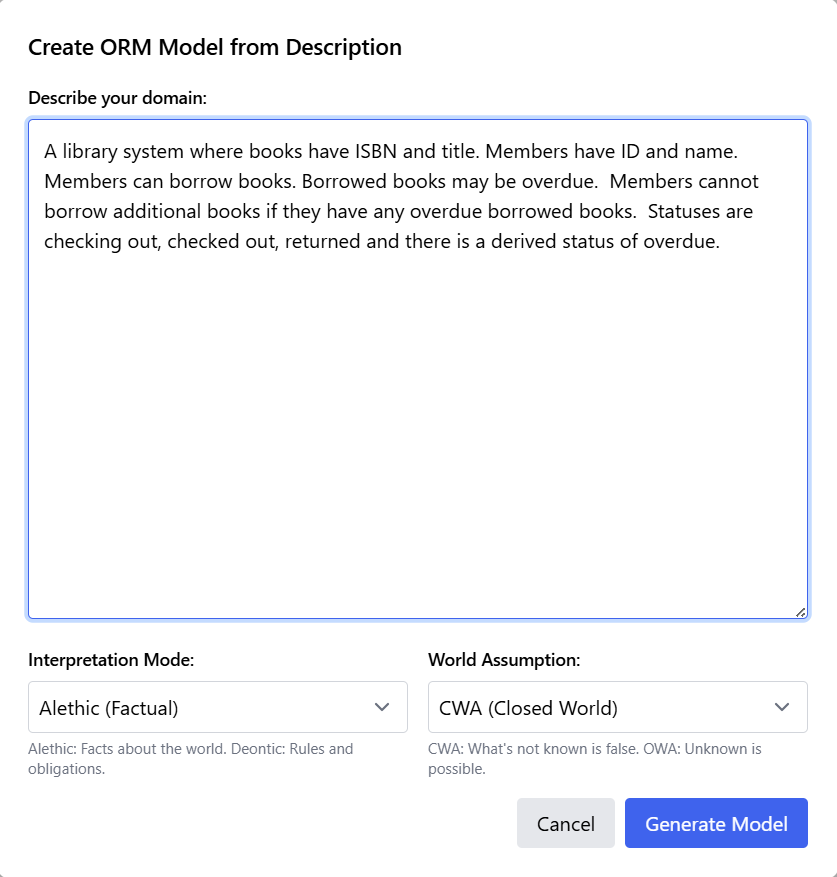
In the example below, a library system is described with the following narrative:
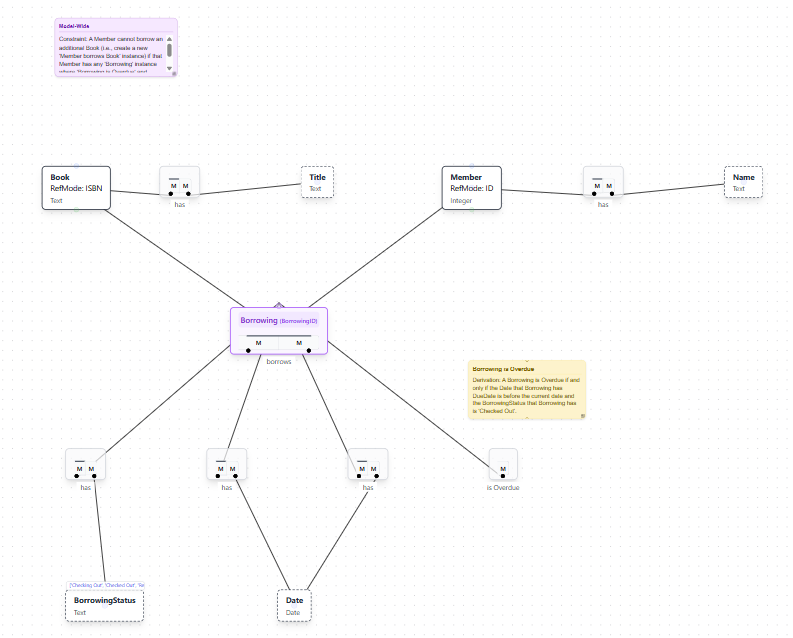
"A library system where books have ISBN and title. Members have ID and name. Members can borrow books. Borrowed books may be overdue. Members cannot borrow additional books if they have any overdue borrowed books. Statuses are checking out, checked out, returned and there is a derived status of overdue."
Initial Model Generation
After clicking "Generate Model," the AI analyzes the description and creates the corresponding ORM model elements, including:
- Entity types (Book, Member)
- Value types (ISBN, Title, ID, Name)
- Fact types (relationships between entities)
- Constraints (uniqueness, mandatory roles, model-wide rules)
- Derived elements (such as the overdue status)
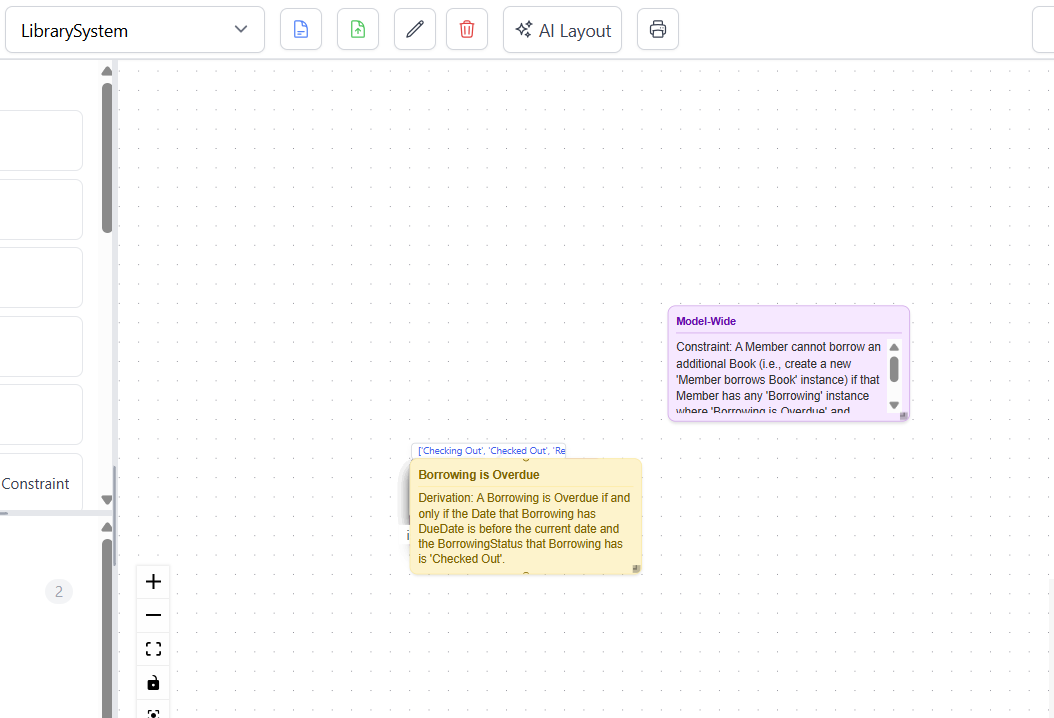
Initially, all model elements are placed on the canvas in a stacked layout, as shown below. While the model is semantically complete, the visual representation requires organization.
AI Layout Assistant
The stacked initial layout from model generation is where the AI Layout Assistant becomes essential. This feature automatically arranges all model elements for optimal readability and visual clarity, transforming a cluttered diagram into a professional, well-organized visualization.
To access the AI Layout Assistant, click the "AI Layout" button in the toolbar. This opens a panel with several configuration options.
AI Layout Panel
The AI Layout Assistant panel provides control over how the layout algorithm processes your model:
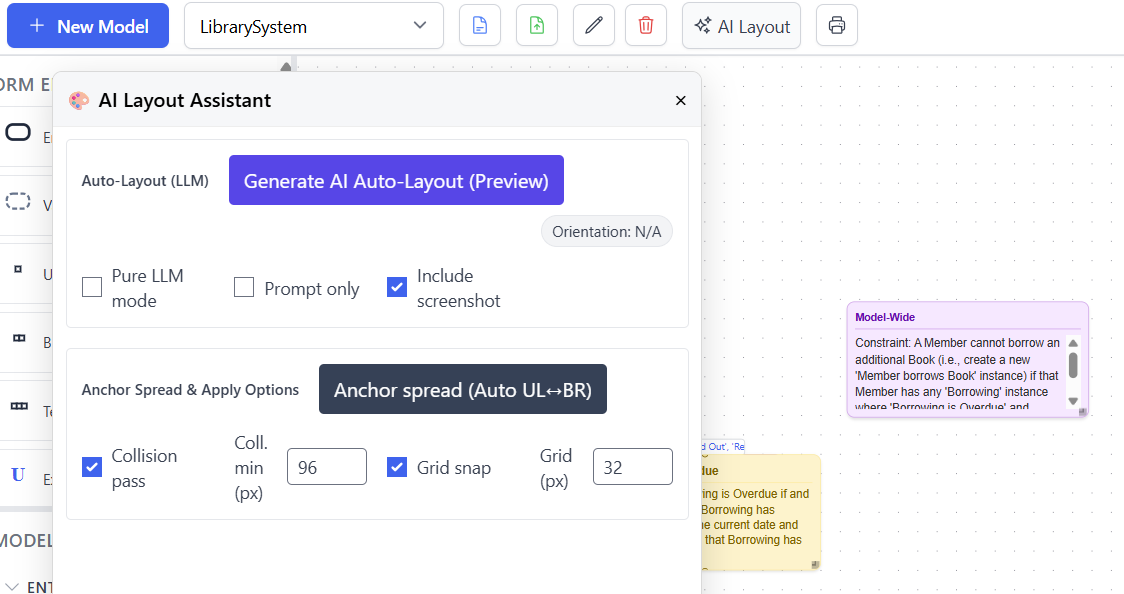
Key options include:
- Pure LLM mode: Uses only the language model for layout decisions without graph algorithms.
- Prompt only: Generates layout instructions without applying them. This is a temporary development feature and will not be available in the public release.
- Include screenshot: Sends a visual representation of the current model to the AI for context-aware layout decisions (recommended).
- Collision pass: Adjusts element positions to prevent overlapping (with configurable minimum spacing in pixels).
- Grid snap: Aligns elements to a grid for cleaner visual appearance (with configurable grid size in pixels).
Preview and Apply
After clicking "Generate AI Auto-Layout (Preview)," the system analyzes the model structure and proposes a layout. The preview shows scattered dots across the canvas representing the proposed positions for each element.
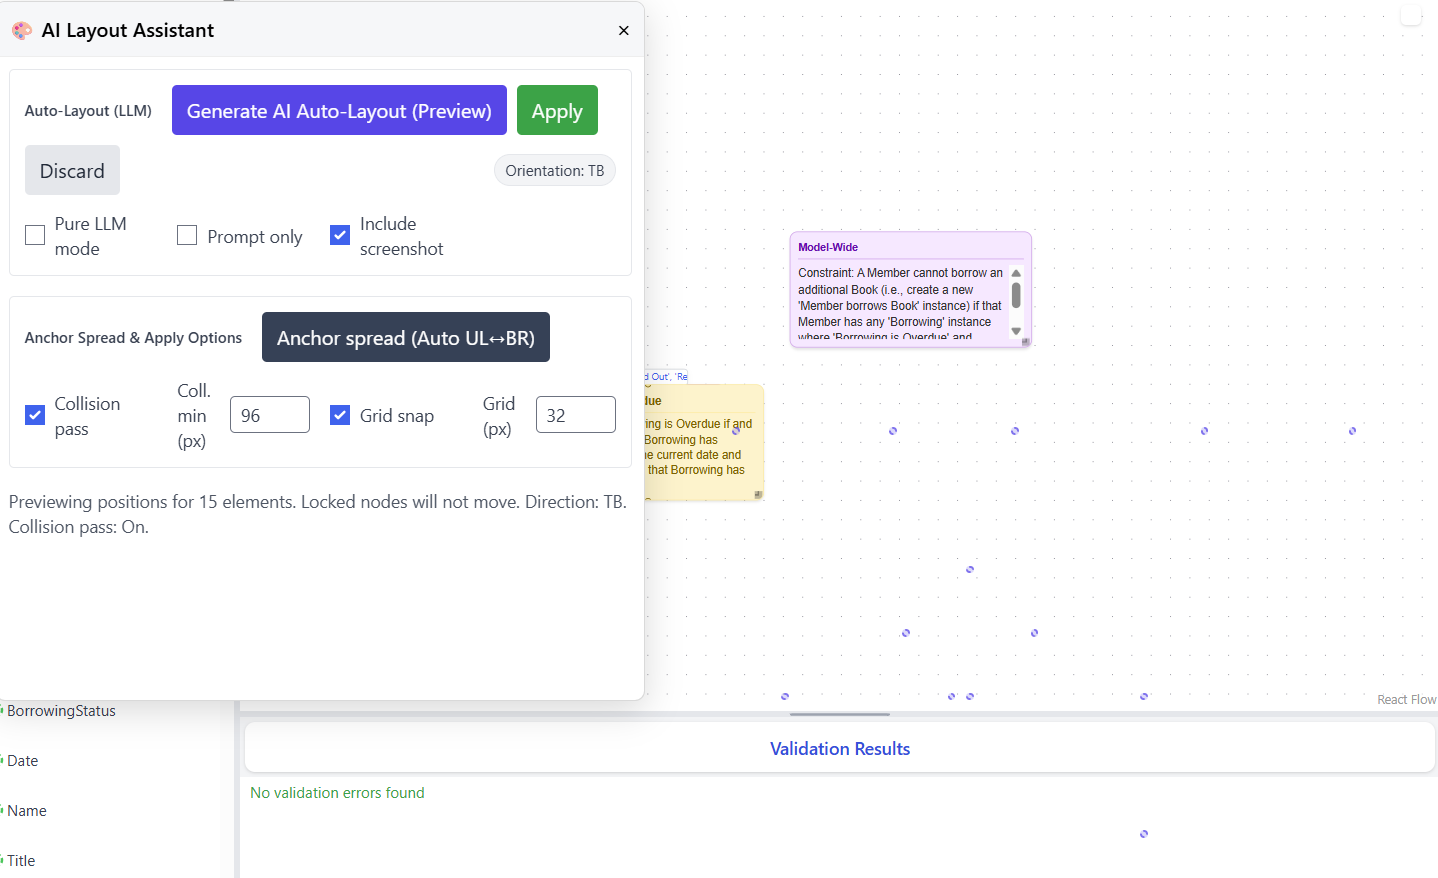
The preview message indicates details such as "Previewing positions for 15 elements. Locked nodes will not move. Direction: TB. Collision pass: On." This allows you to verify the layout approach before applying it. If satisfied with the preview, click "Apply" to implement the layout.
First Layout Result
After applying the AI layout, the model elements are arranged in a structured, hierarchical layout. The algorithm positions elements to minimize line crossings and create clear visual relationships.
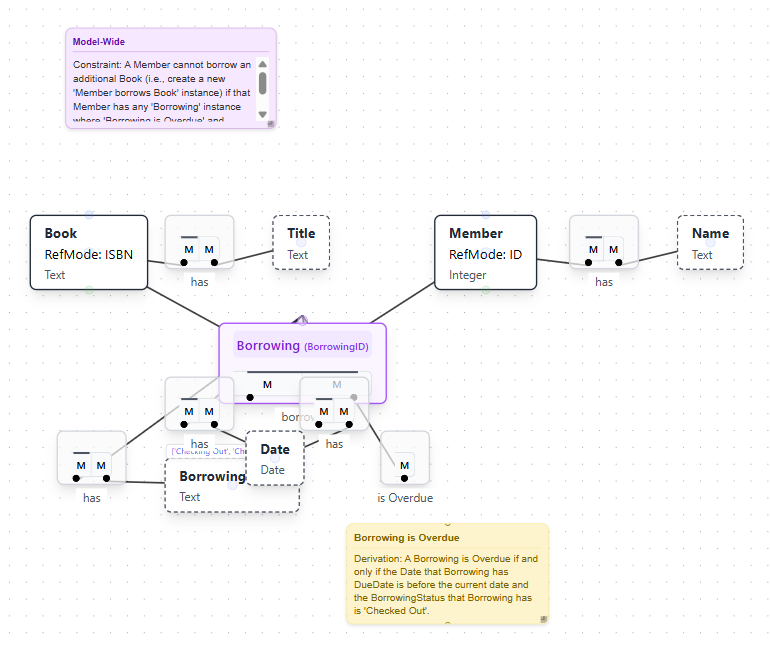
The AI Layout feature uses graph layout algorithms to:
- Position entity types and value types logically based on their relationships
- Minimize connection line crossings for improved readability
- Group related elements together
- Create a hierarchical flow that reflects the model structure
- Respect locked elements that should not move
Anchor Spread Option
If the initial layout feels too compact, the "Anchor spread (Auto UL+BR)" button can spread elements further apart. This option anchors elements at the upper-left and bottom-right corners and distributes other elements across the available space.
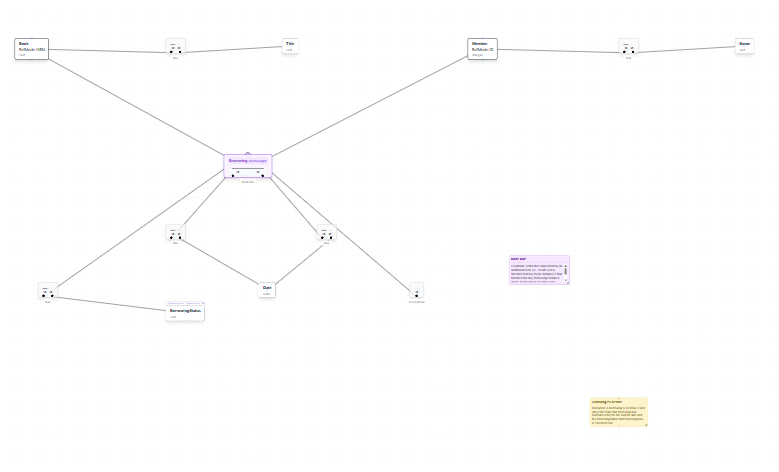
While Auto Spread can increase spacing, it may sometimes spread elements too far apart or create less optimal arrangements. In many cases, running the AI Layout generation a second time produces better results than using Auto Spread.
Iterative Refinement
If the Auto Spread result is not ideal, you can undo it (Ctrl+Z) and run "Generate AI Auto-Layout" again. The AI may produce a different arrangement on subsequent runs, often with improved results.
The second layout generation often produces a more balanced arrangement with better spacing and clearer visual hierarchy. This iterative approach allows you to explore different layout options quickly.
Best Practices for AI Layout
- Include Screenshot: Keep this option enabled for better context-aware layout decisions.
- Enable Collision Pass: Prevents overlapping elements, ensuring all model components remain visible.
- Use Grid Snap: Creates cleaner, more professional-looking diagrams with aligned elements.
- Try Multiple Times: Run the layout generation 2-3 times to find the best arrangement.
- Prefer Re-generation over Auto Spread: Running AI Layout again typically produces better results than using Auto Spread.
- Lock Important Elements: Lock elements that are already well-positioned to preserve their placement during layout.
- Undo is Your Friend: Use Ctrl+Z to revert any layout you don't like and try again.
The AI Layout Assistant dramatically reduces the time required to create readable, professional diagrams. What might take 15-20 minutes of manual positioning can be accomplished in seconds, allowing you to focus on model semantics rather than visual arrangement.
Enhance Model with AI
The Enhance Model feature allows you to refine and extend an existing model using natural language instructions. This is particularly useful for iterative model development, where you start with a basic model and progressively add detail without rebuilding from scratch.
To use this feature, select "Enhance with AI" from the Generate menu. This opens a dialog where you can describe the changes you want to make to your existing model.
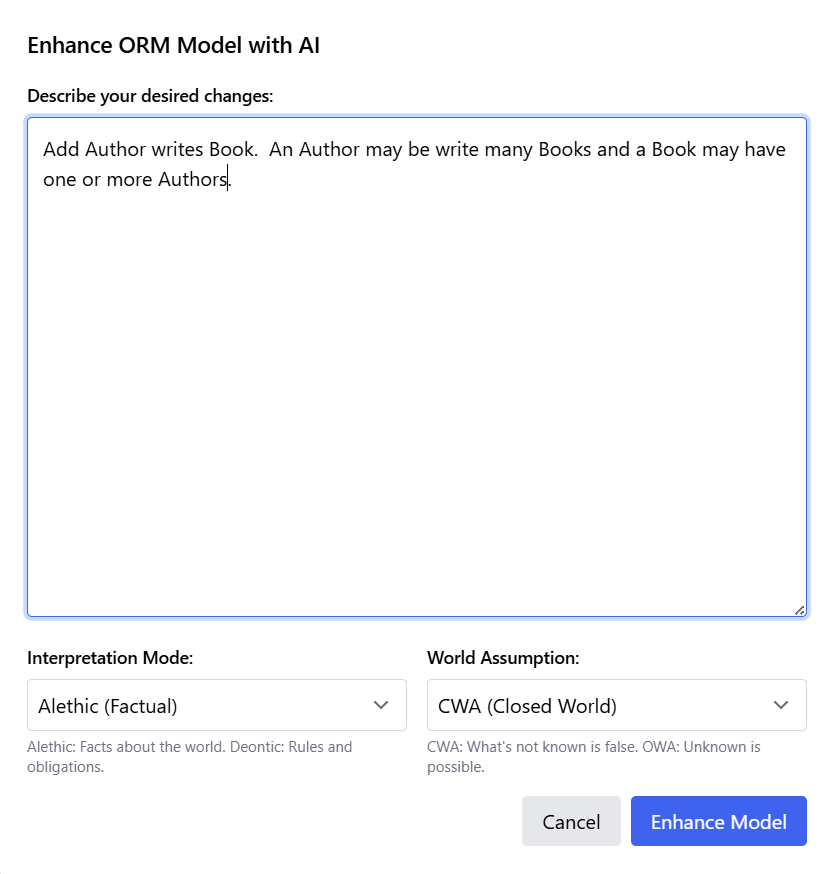
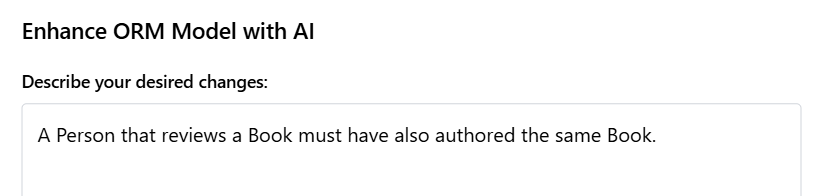
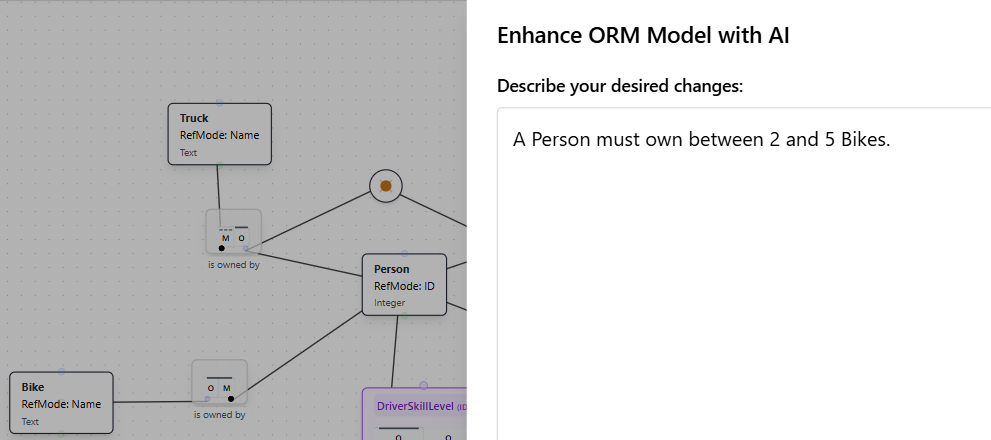
Enhancement Dialog
The Enhance ORM Model with AI dialog provides a text area where you describe your desired changes in natural language. Like the Create Model feature, it includes Interpretation Mode and World Assumption settings to ensure the enhancements align with your modeling approach.
Example: Adding Authors to the Library System
Building on the library system model created earlier, we can enhance it by adding author information. The enhancement instruction reads:
"Add Author writes Book. An Author may write many Books and a Book may have one or more Authors."
This simple instruction tells the AI to:
- Create a new Author entity type
- Add a fact type representing the "writes" relationship
- Configure the relationship as many-to-many (authors can write multiple books, books can have multiple authors)
- Set appropriate uniqueness and mandatory constraints based on the cardinality described
Enhanced Model Result
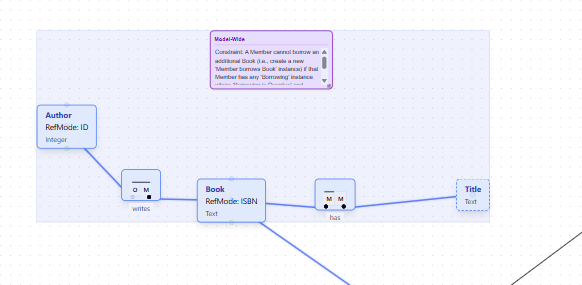
After clicking "Enhance Model," the AI analyzes the existing model structure and integrates the new elements seamlessly. The enhanced model now includes the Author entity type connected to Book through a "writes" fact type.
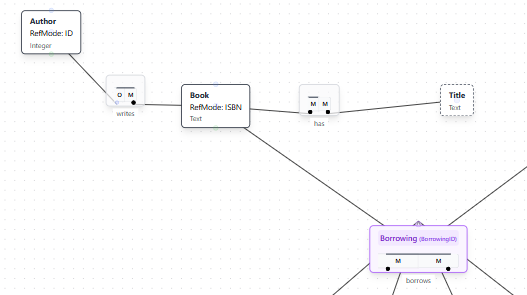
The enhanced model shows:
- Author Entity Type: Added with a reference mode (ID) for identification
- Writes Fact Type: Connecting Author to Book with appropriate roles
- Proper Constraints: Many-to-many relationship configured correctly
- Preserved Elements: All existing model elements (Book, Member, Borrowing, etc.) remain intact
- Integrated Layout: New elements positioned logically within the existing structure
Types of Enhancements
The Enhance Model feature can handle a wide variety of model modifications:
- Add Entity Types: Introduce new concepts to your domain model
- Add Relationships: Create new fact types connecting existing or new entities
- Add Constraints: Include exclusion, subset, ring, or other constraint types
- Add Subtypes: Introduce specialization hierarchies for existing entity types
- Add Derived Elements: Create derived fact types or subtypes based on rules
- Modify Cardinality: Change relationship cardinalities or mandatory constraints
- Add Value Types: Introduce new attributes for entities
Enhancement Examples
Here are additional examples of enhancement instructions you might use:
- "Add a constraint that employees cannot manage themselves"
- "Include a derived fact type for total order value calculated from line items"
- "Add a subtype for premium members with a membership level attribute"
- "Create a ring constraint on the reporting relationship that prevents cycles"
- "Add an exclusion constraint so a person cannot be both an author and a reviewer for the same book"
- "Include publication date for books and add a constraint that borrowed books must have been published"
Best Practices for Model Enhancement
- Be Specific: Clearly describe the elements you want to add and their relationships
- Include Cardinality: Specify whether relationships are one-to-one, one-to-many, or many-to-many
- Mention Constraints: Explicitly state any business rules or constraints that should apply
- One Enhancement at a Time: For complex changes, make incremental enhancements rather than trying to add everything at once
- Review Results: Always verify that the AI correctly interpreted your instructions
- Use AI Layout After: Run the AI Layout Assistant after enhancements to reorganize the diagram
- Iterative Refinement: Use multiple enhancement cycles to build up complex models gradually
The Enhance Model feature makes it easy to evolve your models over time as your understanding of the domain deepens or requirements change. Combined with the AI Layout Assistant, you can rapidly iterate on model design while maintaining professional, readable diagrams.
AI Assistant
The AI Assistant provides interactive help and model analysis capabilities. It can answer questions about your model, generate formal representations, and explain complex constraints in natural language.
To access the AI Assistant, select "AI Assistant..." from the Generate menu. This opens an interactive panel where you can ask questions or request specific outputs.
AI Assistant Panel
The AI Assistant panel provides several quick-action buttons and a text area for custom questions or instructions:
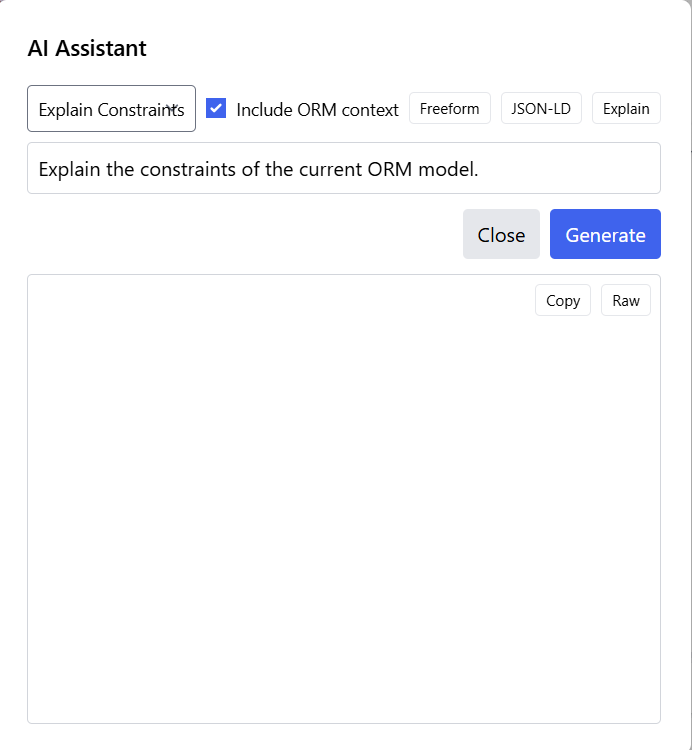
Key features of the panel include:
- Explain Constraints: Quick button to generate a comprehensive explanation of all constraints in your model
- Include ORM context: Checkbox to include the full model structure in the AI's context for more accurate responses
- Freeform: Button to enable open-ended questions about the model or ORM concepts
- JSON-LD: Generate JSON-LD (Linked Data) representations of your model
- Explain: Get explanations of specific model elements or concepts
- Text Input Area: Enter custom questions or instructions for the AI
- Copy and Raw Buttons: Copy the generated response or view the raw output
Example: Explaining Model Constraints
One of the most useful features is the ability to get a comprehensive explanation of all constraints in your model. By clicking "Explain Constraints" and then "Generate," the AI analyzes your model and produces a detailed breakdown.
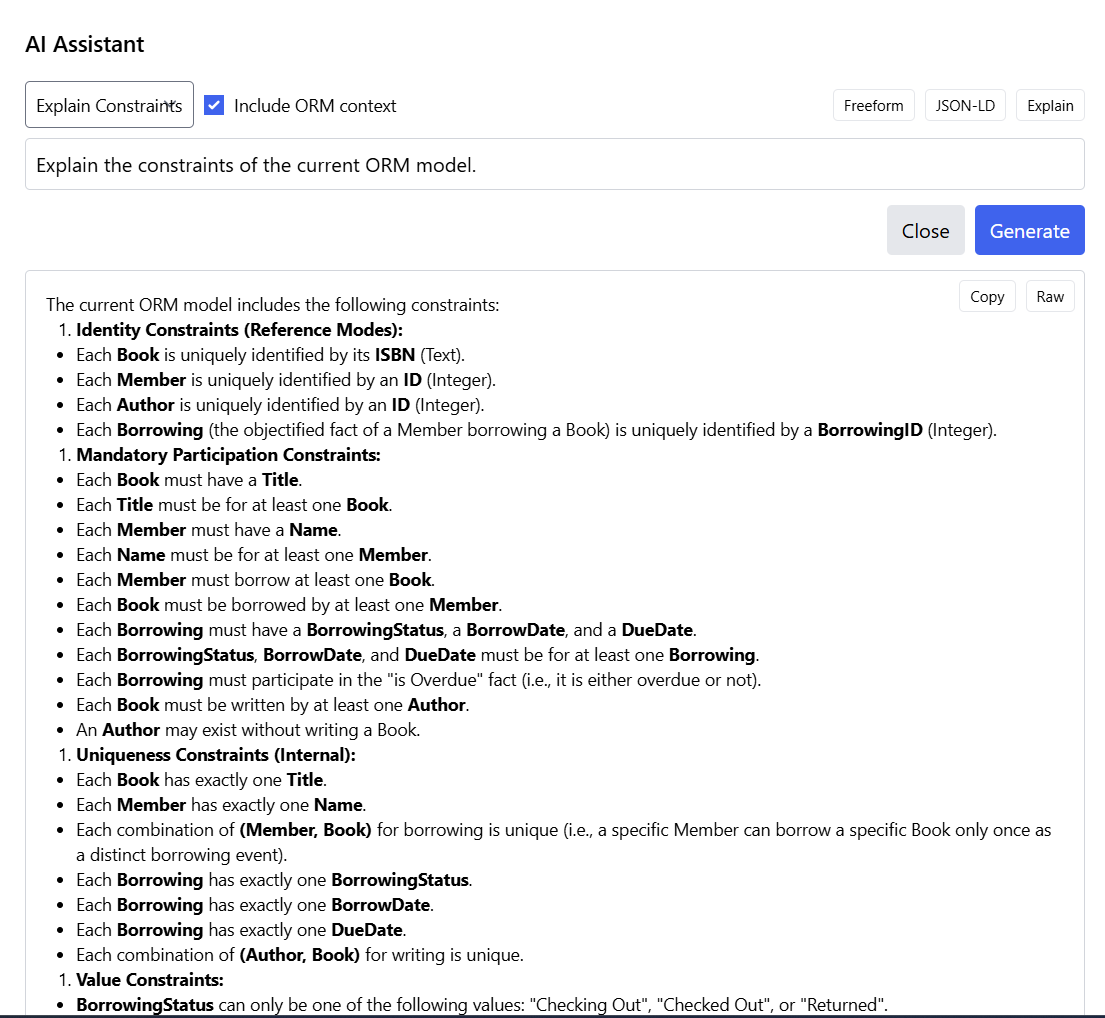
The generated explanation organizes constraints into clear categories:
1. Identity Constraints (Reference Modes)
Lists how each entity type is uniquely identified, such as:
- Each Book is uniquely identified by its ISBN (Text)
- Each Member is uniquely identified by an ID (Integer)
- Each Author is uniquely identified by an ID (Integer)
- Each Borrowing (objectified fact) is uniquely identified by a BorrowingID (Integer)
2. Mandatory Participation Constraints
Explains which relationships are required, such as:
- Each Book must have a Title
- Each Member must have a Name
- Each Member must borrow at least one Book
- Each Book must be written by at least one Author
3. Uniqueness Constraints (Internal)
Describes which combinations must be unique, such as:
- Each Book has exactly one Title
- Each Member has exactly one Name
- Each combination of (Member, Book) for borrowing is unique
- Each combination of (Author, Book) for writing is unique
4. Value Constraints
Lists allowed values for enumerated types, such as:
- BorrowingStatus can only be "Checking Out", "Checked Out", or "Returned"
Additional Capabilities
Beyond constraint explanation, the AI Assistant supports various other tasks:
Question Answering
Ask questions about your model or ORM concepts in general:
- "What is the difference between a mandatory and optional role?"
- "Which entity types in my model have external uniqueness constraints?"
- "How does the objectified fact type Borrowing relate to other elements?"
- "What would happen if I removed the mandatory constraint on Member borrows Book?"
TPTP Generation
Generate Typed First-Order Logic (TPTP) representations of your model for formal verification or reasoning with automated theorem provers.
JSON-LD Export
Create JSON-LD (Linked Data) representations of your model for integration with semantic web technologies, knowledge graphs, or other systems that consume structured data.
Model Validation and Suggestions
Request suggestions for improving model quality:
- "Are there any potential modeling issues in this model?"
- "Suggest additional constraints that might be appropriate for a library system"
- "Is the cardinality between Author and Book correctly modeled?"
Best Practices for Using AI Assistant
- Enable ORM Context: Keep "Include ORM context" checked for more accurate, model-specific responses
- Be Specific: Ask clear, specific questions rather than vague queries
- Use Quick Buttons: Take advantage of the preset buttons for common tasks
- Copy Responses: Use the Copy button to save explanations for documentation
- Iterative Questions: Ask follow-up questions to drill deeper into specific aspects
- Validate Suggestions: Always review AI suggestions critically before implementing changes
- Learning Tool: Use the explanations to deepen your understanding of ORM concepts
Use Cases
The AI Assistant is valuable in several scenarios:
- Documentation: Generate natural language explanations of models for stakeholders
- Learning: Understand ORM concepts and best practices through interactive Q&A
- Review: Get a second opinion on model design decisions
- Integration: Export models in formats suitable for other tools and systems
- Validation: Verify that constraints correctly represent business rules
- Communication: Translate formal models into language non-technical stakeholders can understand
The AI Assistant serves as an interactive modeling companion, helping both novice and experienced modelers understand and improve their semantic models. It bridges the gap between formal ORM notation and natural language understanding, making models more accessible to diverse audiences.
Multi-Select for Diagram Manipulation
While AI Layout handles most positioning automatically, you may want to manually adjust groups of elements after layout generation. The ORM Modeler provides two multi-select methods to make moving multiple elements easier and more efficient.
Rectangular Area Selection
To select multiple elements within a rectangular area, hold down the Shift key and click and drag with the left mouse button. This creates a selection rectangle that captures all elements within the defined area.
The rectangular selection method is ideal for:
- Selecting a cluster of related elements that are positioned near each other
- Moving an entire section of the diagram to a different location
- Quickly selecting multiple elements without clicking each one individually
- Reorganizing groups of elements after AI layout generation
Individual Element Selection
For more precise control, you can select individual elements one at a time using Ctrl+left mouse click. Each element you click while holding Ctrl is added to the selection, allowing you to build a custom group of elements regardless of their position on the canvas.
Individual selection is useful when:
- Elements are scattered across different areas of the diagram
- You need to select specific elements while excluding others nearby
- Building a precise selection that doesn't fit a rectangular pattern
- Fine-tuning element positions after using rectangular selection
Working with Selected Elements
Once you have selected multiple elements using either method, you can:
- Move Together: Click and drag any selected element to move the entire group
- Maintain Relative Positions: Elements maintain their spacing and relationships while being moved
- Combine Methods: Use Shift+drag to select a group, then Ctrl+click to add or remove individual elements
- Deselect: Click on an empty area of the canvas to clear the selection
Practical Workflow
Multi-select features work particularly well in combination with AI Layout:
- Use AI Layout to generate an initial arrangement
- Identify sections that need adjustment
- Use Shift+drag to select groups of related elements
- Move the selected group to a better position
- Use Ctrl+click to fine-tune individual element positions
- Repeat as needed to achieve the desired layout
This combination of automated AI layout and manual multi-select adjustment gives you the best of both worlds: the speed of automated positioning with the precision of manual control when needed.
Benefits and Best Practices
Benefits of AI-Assisted Modeling
- Rapid Prototyping: Quickly generate initial models from domain descriptions to explore different modeling approaches.
- Learning Tool: See how natural language descriptions translate into formal ORM models, helping users learn ORM concepts.
- Consistency: AI-generated models follow ORM best practices and maintain consistent naming conventions.
- Time Savings: Reduce manual effort in creating and laying out complex models.
- Accessibility: Enable domain experts without deep ORM knowledge to contribute to model development.
Best Practices
- Start Simple: Begin with a clear, concise domain description focusing on core concepts before adding complexity.
- Review and Refine: Always review AI-generated models carefully. The AI provides a strong starting point but may require adjustments.
- Iterative Enhancement: Use the Enhance feature to progressively add detail rather than trying to capture everything in the initial description.
- Validate Constraints: Pay special attention to generated constraints to ensure they accurately reflect business rules.
- Use AI Layout: After any significant model changes, use the AI Layout feature to maintain visual clarity.
- Combine with Manual Modeling: Use AI features alongside traditional modeling techniques for the best results.
Additional AI Capabilities
Verbalization and Model Narrative
Beyond the interactive AI features, the ORM Modeler also provides AI-generated documentation:
- Verbalization: Automatically generates natural language statements for each fact type and constraint in the model.
- Model Narrative: Creates a comprehensive natural language description of the entire model, including entity types, relationships, and business rules.
These features help bridge the gap between formal models and stakeholder communication, making models more accessible to non-technical audiences.
Auto-Fix Model Issues
The Auto-Fix feature (also available in the Generate menu) can automatically detect and resolve common modeling issues such as:
- Missing mandatory constraints
- Incomplete uniqueness constraints
- Inconsistent naming patterns
- Structural issues that violate ORM rules
Looking Ahead
The AI capabilities in the ORM Modeler continue to evolve. Future enhancements may include:
- Multi-turn conversations for iterative model refinement
- Pattern recognition to suggest common modeling patterns
- Integration with domain-specific ontologies
- Automated model comparison and merging
- Enhanced visualization recommendations based on model complexity
These AI features represent a significant step forward in making semantic modeling more accessible and efficient, while maintaining the rigor and precision that ORM provides.
Additional Enhancement Examples
The following examples demonstrate how to use the Enhance Model with AI feature to add various types of constraints using natural language. These examples are provided for illustration purposes and do not necessarily represent realistic business rules. They show the flexibility and power of the AI enhancement feature in understanding and implementing different constraint types.
Adding an Exclusion Constraint
An exclusion constraint prevents the same entity from participating in multiple roles across different fact types. In this example, we add a constraint that prevents a Person from being both an author and a reviewer of the same Book.
Starting Model: The model includes Person authors Book and Person reviews Book as separate fact types.
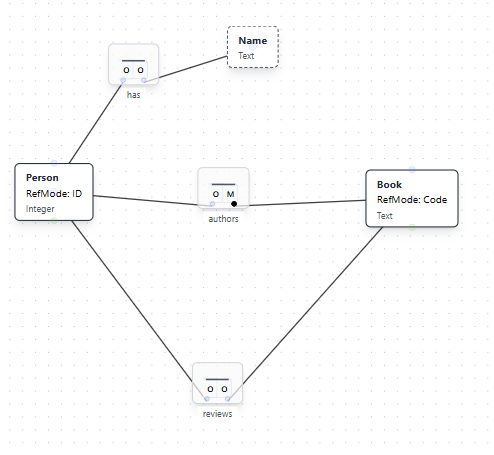
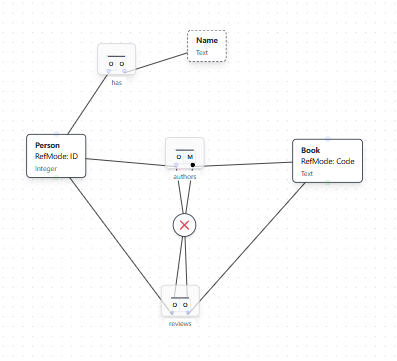
Natural Language Instruction: "A Person may not both author and review the same Book"

Result: The AI adds an exclusion constraint (shown with an X symbol) connecting the two fact types, ensuring that if a Person authors a Book, they cannot review that same Book, and vice versa.
Adding a Subset Constraint
A subset constraint specifies that one set of role combinations must be a subset of another. This example shows how to express that reviewers must also be authors of the same book.
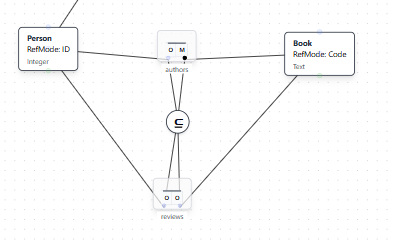
Natural Language Instruction: "A Person that reviews a Book must have also authored the same Book."
Result: The AI adds a subset constraint (shown with a circled ⊆ symbol) indicating that the set of Person-Book pairs in the reviews relationship must be a subset of the Person-Book pairs in the authors relationship.
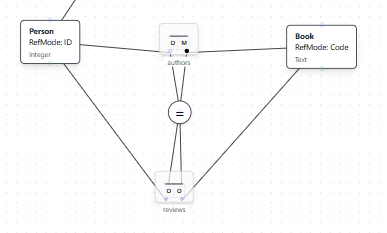
Adding an Equality Constraint
An equality constraint specifies that two sets of role combinations must contain exactly the same instances. This example demonstrates requiring that authors and reviewers are exactly the same set for each book.
Natural Language Instruction: "A Person must both author and review the same Book."
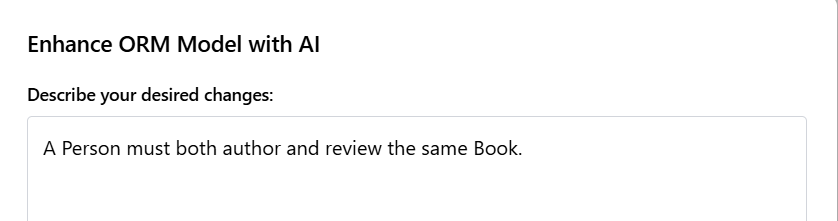
Result: The AI adds an equality constraint (shown with a circled = symbol) specifying that the set of Person-Book pairs must be identical across both the authors and reviews relationships.
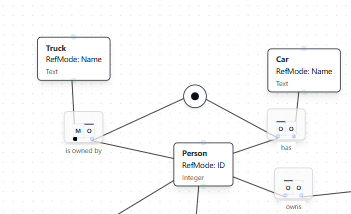
Adding an Inclusive-Or Constraint
An inclusive-or constraint requires that an entity must participate in at least one of several roles, and may participate in multiple roles. This example shows a Person who must own a Truck, have a Car, or both.
Natural Language Instruction: "A Person must either own a Truck or have a Car or both."
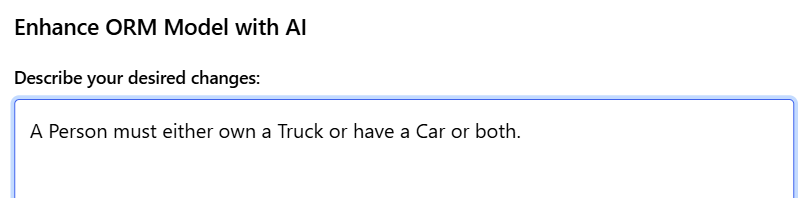
Result: The AI adds an inclusive-or constraint (shown with a circled dot) connecting the two fact types, ensuring each Person participates in at least one of the relationships.
Adding an Exclusive-Or Constraint
An exclusive-or constraint requires that an entity must participate in exactly one of several roles, but not multiple roles simultaneously. This example demonstrates a Person who must own either a Truck or a Car, but not both.
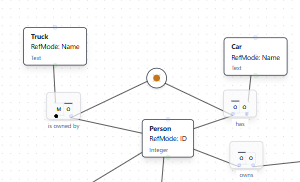
Natural Language Instruction: "A Person must either own a Truck or a Car but not both."
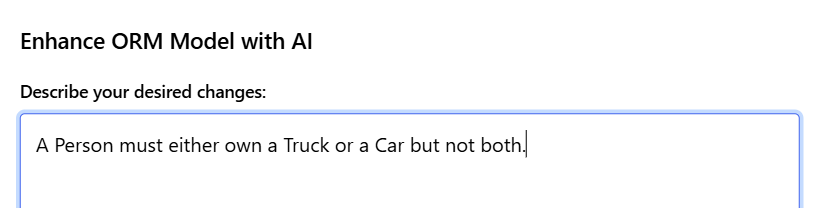
Result: The AI adds an exclusive-or constraint (shown with a circled X with a dot) connecting the two fact types, ensuring each Person participates in exactly one of the relationships.
Using AI Assistant to Explain the Constraint: After adding the exclusive-or constraint, you can use the AI Assistant to get a natural language explanation of what the constraint means.
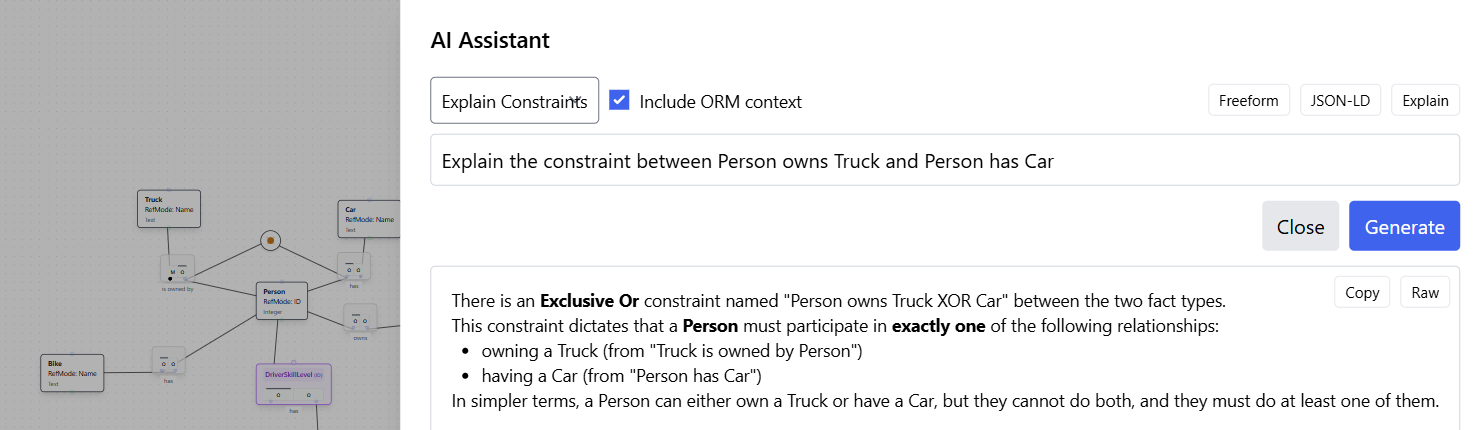
The AI Assistant provides a clear explanation: "There is an Exclusive Or constraint named 'Person owns Truck XOR Car' between the two fact types. This constraint dictates that a Person must participate in exactly one of the following relationships: owning a Truck (from 'Person owns Truck') or having a Car (from 'Person has Car'). In simpler terms, a Person can either own a Truck or have a Car, but they cannot do both, and they must do at least one of them."
Adding a Value Comparison Constraint
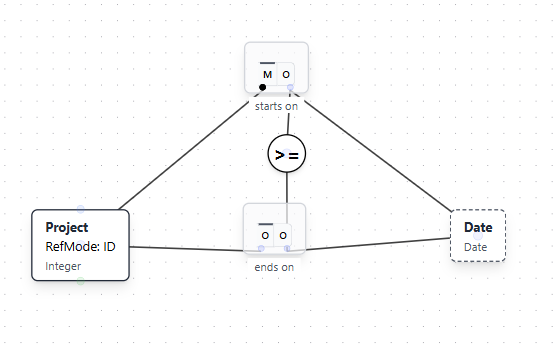
Value comparison constraints enforce relationships between values in different roles, such as requiring one date to be before or after another. This example demonstrates adding a constraint that ensures a project end date occurs on or after the start date.
Natural Language Instruction: "A Project must end on or after the Project starts."
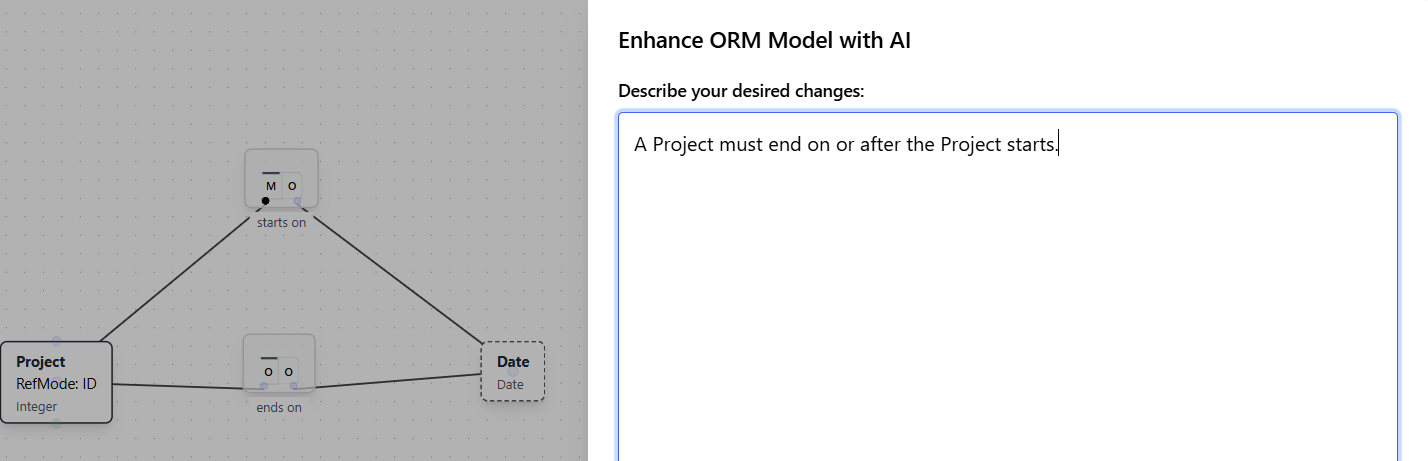
Result: The AI adds a value comparison constraint (shown with a circled ≥ symbol) connecting the "starts on" and "ends on" roles, ensuring that the end date is greater than or equal to the start date.
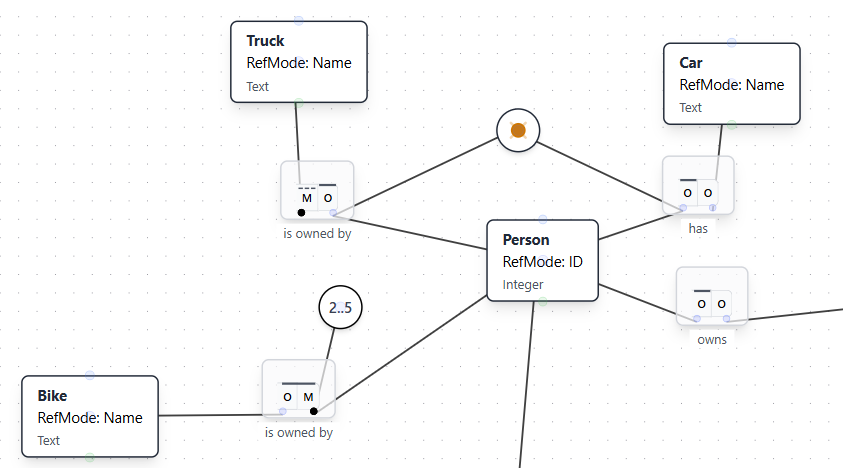
Adding a Frequency Constraint
Frequency constraints specify the minimum and maximum number of times an entity can participate in a relationship. This example shows how to add a constraint that requires a Person to own between 2 and 5 Bikes.
Natural Language Instruction: "A Person must own between 2 and 5 Bikes."
Result: The AI adds a frequency constraint (shown as "2..5" in a circle) on the Person's role in the "owns Bike" relationship, specifying that each Person must own a minimum of 2 and a maximum of 5 Bikes.
Key Takeaways
These examples demonstrate several important capabilities of the Enhance Model with AI feature:
- Natural Language Understanding: The AI interprets constraint descriptions in plain English and maps them to the appropriate ORM constraint types.
- Constraint Recognition: The system recognizes different constraint patterns (exclusion, subset, equality, inclusive-or, exclusive-or) from the phrasing of the instruction.
- Proper Notation: Generated constraints use correct ORM notation and symbols.
- Context Awareness: The AI understands which fact types and roles are involved based on the entity and relationship names mentioned.
- Flexible Phrasing: Multiple ways of expressing the same constraint type can be understood (e.g., "may not both" for exclusion, "must either...or" for inclusive-or).
By using natural language to describe constraints, modelers can quickly add complex business rules without needing to manually construct constraint symbols and connections. This accelerates model development while maintaining the precision and rigor of formal ORM notation.